
Of course! A White Chocolate Strawberry Cheesecake is the epitome of elegance and indulgence. It combines a rich, creamy white chocolate filling with the bright, fruity flavor of strawberries, all nestled into a crisp crust.
Here is a detailed recipe for a stunning, restaurant-quality cheesecake that’s sure to impress.
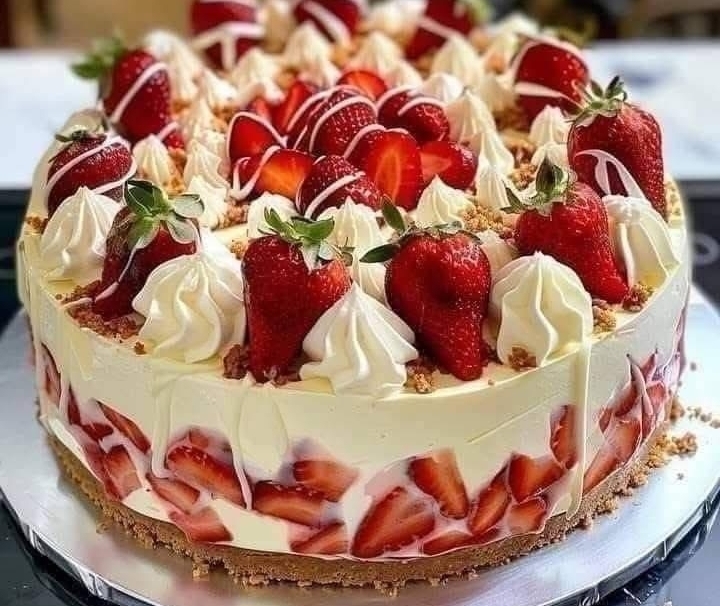
The Blueprint: Three Perfect Layers
The Crust: A buttery, crunchy base, typically made from graham crackers or biscuits.
The Filling: A luxuriously smooth and dense white chocolate cheesecake.
The Topping: A gorgeous, glazed fresh strawberry layer.
Recipe: White Chocolate Strawberry Cheesecake
This recipe uses a water bath to ensure a perfectly creamy, crack-free texture.
Ingredients:
For the Crust:
· 2 cups (about 200g) graham cracker crumbs (or digestive biscuits)
· 1/3 cup (67g) granulated sugar
· 1/2 cup (113g) unsalted butter, melted
· Pinch of salt
For the White Chocolate Filling:
· 12 oz (340g) high-quality white chocolate, finely chopped
· 4 packages (8 oz / 224g each) full-fat cream cheese, at room temperature
· 1 cup (200g) granulated sugar
· 1 cup (240ml) sour cream, at room temperature
· 4 large eggs, at room temperature
· 1 tablespoon vanilla extract
· 1/4 teaspoon salt
For the Strawberry Topping:
· 1.5 lbs (about 680g) fresh strawberries, washed and hulled
· 1/2 cup (100g) granulated sugar
· 1 tablespoon lemon juice
· 2 tablespoons water
· 1 tablespoon cornstarch mixed with 1 tablespoon cold water (slurry)
Instructions:
Step 1: Prepare the Crust
Preheat Oven: Preheat oven to 325°F (160°C). Wrap the outside of a 9-inch springform pan tightly with 2-3 layers of heavy-duty aluminum foil to prevent water leakage.
Mix Crust: In a medium bowl, combine the graham cracker crumbs, sugar, and salt. Pour in the melted butter and stir until the mixture resembles wet sand.
Press into Pan: Press the mixture firmly and evenly into the bottom and about halfway up the sides of the prepared springform pan. Use the bottom of a flat glass to compact it.
Bake: Bake for 10 minutes. Remove and let it cool while you prepare the filling. Reduce oven temperature to 300°F (150°C).
Step 2: Make the White Chocolate Filling
Melt Chocolate: Melt the finely chopped white chocolate in a double boiler or in a heatproof bowl over a pot of simmering water (ensure the bowl doesn’t touch the water). Stir until smooth. Alternatively, microwave in 20-second bursts, stirring each time, until melted. Let it cool slightly.
Beat Cream Cheese: In the bowl of a stand mixer fitted with a paddle attachment (or with a hand mixer), beat the cream cheese and sugar on medium-low speed until perfectly smooth and creamy, about 3-4 minutes. Scrape down the bowl several times. Do not over-whip.
Incorporate Ingredients: With the mixer on low, add the sour cream and vanilla extract. Mix until combined. Add the slightly cooled, melted white chocolate and mix until uniform.
Add Eggs: Add the eggs one at a time, mixing on low speed just until the yolk disappears into the batter after each addition. Over-mixing at this stage incorporates too much air and can cause cracking.
Final Mix: Scrape the bowl thoroughly and give the batter one final, gentle stir by hand.
Step 3: The Water Bath Bake
Pour Batter: Pour the filling into the cooled crust and smooth the top.
Prepare Water Bath: Place the foil-wrapped springform pan into a large roasting pan. Bring a kettle of water to a boil.
Bake: Carefully pour the hot water into the roasting pan until it comes about halfway up the sides of the springform pan.
Bake Time: Bake at 300°F (150°C) for 1 hour and 15 minutes to 1 hour and 30 minutes. The edges will be set, but the center will still have a slight jiggle (like Jell-O) when you gently shake the pan. Turn the oven off, crack the oven door open, and let the cheesecake cool in the oven for 1 hour. This gradual cooling is the #1 secret to preventing cracks.
Cool Completely: Remove the cheesecake from the water bath, remove the foil, and place it on a wire rack to cool to room temperature. Then, cover and refrigerate for at least 6 hours, preferably overnight.
Step 4: Prepare the Strawberry Topping
(Do this a few hours before serving, or while the cheesecake is chilling.)
Slice Strawberries: Slice about two-thirds of the strawberries. Set aside the most beautiful, similar-sized ones for the top layer.
Make Glaze: In a medium saucepan, combine the sliced strawberries, sugar, lemon juice, and 2 tablespoons of water. Cook over medium heat, stirring, until the berries break down and the sugar dissolves, about 5-7 minutes.
Thicken: Whisk the cornstarch slurry and add it to the bubbling strawberry mixture. Cook for another 1-2 minutes, stirring constantly, until the mixture thickens and becomes glossy.
Cool: Remove from heat and let the glaze cool completely to room temperature. It will continue to thicken as it cools.
Step 5: Assemble the Masterpiece
Arrange Whole Strawberries: Arrange the reserved whole strawberries, pointed ends up, tightly together on top of the chilled cheesecake.
Spoon Glaze: Carefully spoon or brush the cooled strawberry glaze over the whole strawberries, making sure to get it in between the berries to seal everything. The glaze will act as a glue and give a beautiful, professional shine.
Final Chill: Return the cheesecake to the refrigerator for at least 30 minutes to let the glaze set.
Pro-Tips for Success:
· Room Temperature is Key: Having the cream cheese, eggs, and sour cream at room temperature prevents a lumpy batter and ensures a silky-smooth texture.
· Don’t Over-mix: Once the eggs are added, mix on low speed and only until combined. Over-mixing incorporates air, which leads to a puffy, cracked cheesecake.
· High-Quality White Chocolate: The flavor of the filling hinges on this. Use a bar of baking chocolate (like Ghirardelli or Lindt), not white chocolate chips, which contain stabilizers that can prevent them from melting smoothly.
· Patience is a Virtue: The long, slow chill is non-negotiable for the perfect texture and clean slices.
Slice with a hot, clean knife for beautiful servings. Enjoy your magnificent creation